
Cheesecakes can be tricky. This is something I know all too well after the last few days. I admit I do not bake them often. The few I’ve baked in the last few years have turned our marvelously. So I can only say I’ve learned a few things working through the disasters. But first, let’s start from the beginning. It’s National Cheesecake Day and I thought it would be the perfect opportunity to share my Mom’s Cheesecake recipe.
A little history on mom’s cheesecake: My mom has made this cheesecake for as long as I can remember. It is the one I use as the benchmark for all cheesecakes. It has a thin pastry crust and the cake is dense with a hint of citrus. It is one of two cheesecakes my mom makes. She refers to this one as “The Clunky One”. Why? Because her other one is whipped and lighter in texture. This cheesecake always cracked. It is those cracks that led me to my first disaster.
I’ve heard to bake cheesecakes in a water bath to reduce or eliminate cracks. My mom never baked hers in a water bath. So here I go thinking I’m going to do this water bath thing and have it not crack. All was going well until I opened the oven door to find it sitting in a pool of bubbling water. There was a hole in the foil and water leaked through. The result was a total soggy bottom and a crust that would squish when I touched it.
The next cheesecake went in the oven without a water bath. I decided to bake it just like my mom did for so many years. I looked in the oven as it was baking and oh did it ever have some cracks. They were not little ones. They were Grand Canyon cracks. The top and crust were browning way too much. I hoped it would work out in the end. I took it out of the oven, left the house, and came home to find it sank like I’ve never seen before. You can imagine my frustration at this point.
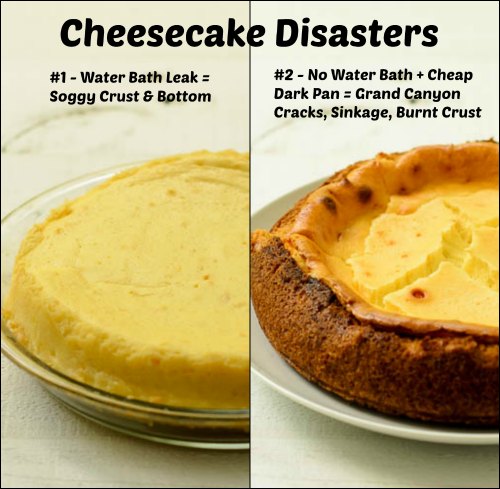

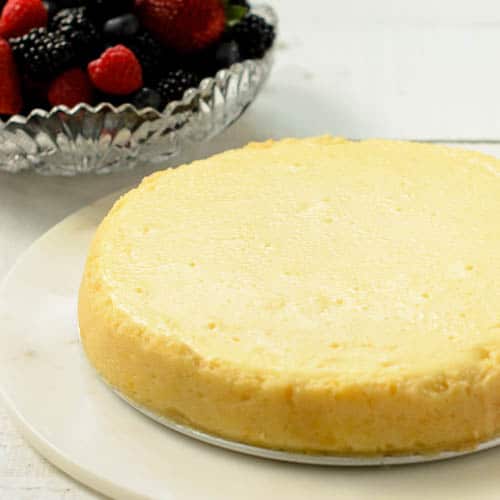
Off to the store I went to get supplies for a third cheesecake. I also got a new springform pan made of aluminum and without a dark finish. Then the big decision came, bake in a water bath or not. I decided to go with the water bath and use two layers of foil. The cheesecake finished perfectly without cracking or sinking. The crust didn’t brown as much as I would like however the texture of it and the cake came out exactly as it should. Whew!

More about my mom’s cheesecake: The crust is what really makes this cake unique. It’s very thin and it is not easy to make. I repeat: not easy to make. I used one of my husband’s roller tools to get it rolled out to the edge of the pan bottom because the bottom has a lip on it and a regular rolling pin would not work right. You have to roll out the side in three strips between wax or parchment paper. You absolutely must measure the length of those strips. The dough must be rolled out to 9 inches (or perhaps 1/4-inch more). Chill the strips before trying to put them in the pan. Peel off one side of the paper, put it back, flip it over, and peel off the other side. Then lift the strip delicately and get it to the side of the pan as quickly as possible. I think it would be a miracle to get the strips to the pan without at least one of them breaking. It’s okay though. All you have to do is press the edges together.


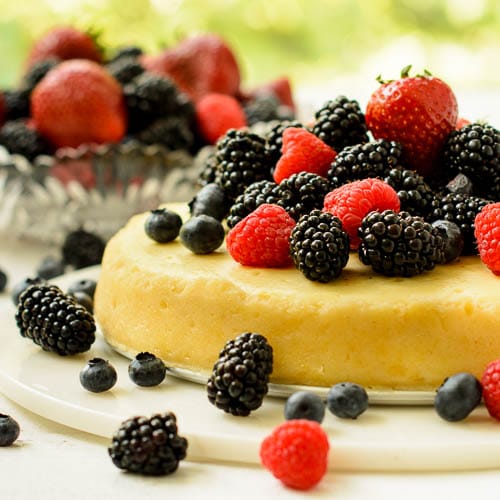
Was all that effort worth it? Sure it was! I can laugh at the disasters while I’m enjoying a slice. Mom’s cheesecake is my favorite one of all. I’ve shared a couple others; Chocolate Covered Cherry Cheesecake and Brownie Chocolate Chip Cheesecake. Scroll down to find a great big list of recipes by wonderful bloggers celebrating National Cheesecake Day. Special thanks to Roxana of Roxana’s Home Baking for putting together this tasty event. Oh, and what did I do with the two disaster cakes? Stay tuned to find out…

Mom’s Cheesecake
Ingredients
For the crust:
- 1 cup sifted bleached all-purpose flour sift before measuring
- 1/4 cup granulated sugar
- 1 teaspoon grated lemon zest
- 1/2 teaspoon vanilla extract
- 1 egg yolk
- 1/4 cup unsalted butter at room temperature
For the filling:
- 24 ounces cream cheese not whipped, at room temperature
- 1 cup granulated sugar
- 2 tablespoons all-purpose flour
- 1 teaspoon grated lemon zest
- 1 teaspoon grated orange zest
- 1/4 teaspoon vanilla extract
- 3 eggs plus 1 egg yolk at room temperature
- 3 tablespoons heavy whipping cream at room temperature
- Very hot water for baking cheesecake in a water bath
Instructions
For the crust:
-
Preheat oven to 400 degrees F. Lightly grease a 9-inch springform pan. Remove side of the pan.
-
Whisk together flour, sugar, and lemon zest in a medium bowl. Sprinkle vanilla over the mixture.
-
Make a well in the center and add egg yolk and butter. Use a fork to cut in the butter and yolk until it is combined and crumbly.
-
Form 1/2 of the dough into a ball. Place the dough ball on the pan bottom. Cover with wax or parchment paper. Roll dough out to the edge (it will be very thin).
-
Bake until golden, about 5 minutes. Cool completely. Assemble pan after the bottom crust has cooled completely.
-
Divide the remaining dough into 3 equal parts, pressing each one together into a log. Cut 6 strips of wax or parchment paper 3 inches wide.
-
Place each dough log between 2 strips of the paper. Roll out each dough log to 2 1/4 inches wide by 9 inches long (it will be very thin). The length is important so measure to be accurate. The width should be 2 inches at a minimum. Chill the strips for at least 10 minutes.
-
Transfer the dough strips to the sides of the pan. It is best to pull off the top paper, lay it back on top, flip it over, and pull off the other paper. If the strips break (which they probably will), press them back together once in the pan.
For the filling:
-
Increase oven temperature to 450 degrees F.
-
Blend together cream cheese, sugar, flour, sugar, lemon zest, orange zest, and vanilla in a large bowl until smooth, using a hand mixer at medium speed.
-
Add eggs and egg yolk one at a time, mixing well between each addition. Add cream and stir or blend to combine.
-
Spread batter evenly in prepared pan.
-
Wrap heavy duty aluminum foil around the sides and bottom of the pan (2 layers to be safe).
-
Place the foil-wrapped springform pan into a larger deep baking pan (at least 2 to 3 inches deep) that it fits into easily.
-
Place both pans in the oven. Pour hot water into the large pan so that is about halfway up, about 1 1/2 to 2 inches.
-
Bake for 10 minutes.
-
Reduce oven temperature to 250 degrees F and bake for 1 hour.
-
Lift foil wrapped pan out of the water bath and place on a rack.
-
Carefully lift the pan with water out of the oven and discard water.
-
Cool cheesecake completely to room temperature, about 2 hours.
-
Chill cheesecake thoroughly, at least 3 hours or overnight.
-
Remove foil and side of pan before serving.
Recipe Notes
Time stated includes cooling and chilling after baking. Hands-on and baking time is about 2 hours, 30 minutes.
Do you enjoy cheesecake? Check out these recipes for everything from traditional to new twists, from beverages to ice cream, and more:
Baked Cheesecakes:
- Apricot Ricotta Cheesecake from Diethood
- Blackberry Goat Cheese Cheesecake from Baking a Moment
- Blueberry Ricotta Cream Cheesecake from Hungry Couple
- Caramel Macchiato Cheesecake from Wishes and Dishes
- Cheesecake Factory Vegan Copycat Oreo Cheesecake from Namely Marly
- Chocolate Cheesecake w/ Whisky Toffee Shards from girlichef
- Chocolate Chip Cookie Mini Cheesecakes from My Sweet Zepol
- Chocolate-Covered Strawberry Cheesecake from Savvy Eats
- Coconut Cheesecake with Macadamia Crust from All Day I Dream About Food
- Gluten-Free Mini Cheesecakes with Toasted Coconut Crust from Quarter Life (Crisis) Cuisine
- Hawaiian Chantilly Layer Cheesecake from Wallflour Girl
- Key Lime Pie Cheesecake from Love and Confections
- Lemon Cheesecake from Shugary Sweets
- Lemon Ginger Panna Cotta Cheesecake + Blueberry Sauce from Girl Versus Dough
- Lightened Up Apricot-Swirl Cheesecake from Take A Bite Out of Boca
- Lilikoi Cheesecake with Macadamia Nut Shortbread Crust from Dieter’s Downfall
- Mini Hawaiian Cheesecakes from Pint Sized Baker
- Mini Mascarpone Cheesecakes with Strawberry Balsamic Topping from Boulder Locavore
- Mom’s Cheesecake from Magnolia Days
- New York Style Cheesecake from URBAN BAKES
- Oreo Ripple Cheesecake from Overtime Cook
- Peanut Butter Cheesecake with Nutella Ganache Topping from The Redhead Baker
- Pumpkin Cheesecake from Lady Behind The Curtain
- Rainbow Cheesecake from In Katrina’s Kitchen
- Raspberry Cheesecake with Oreo Crust from Hip Foodie Mom
- Ricotta Cheesecake with Strawberry Basil Sauce from French Press
- Salted Caramel Apple Cheesecake from Jane’s Adventures in Dinner
- Snickers Cheesecake from Life, Love and Sugar
- Sugar Cookie Cheesecake from Munchkin Munchies
- Vanilla Bean Cheesecake from Wine & Glue
- Vegan Mango Coconut Cheesecake from Jessiker Bakes
- Very Berry Cheesecake from JavaCupcake
- White Chocolate Cheesecake with Macadamia Nuts and Caramel from Taste and Tell
- White Chocolate Frangelico Cheesecake from That Skinny Chick Can Bake
- White Chocolate Raspberry Swirl Cheesecake from Will Cook For Smiles
No Bake Cheesecakes:
- Butter Pecan Caramel No-Bake Mini Cheesecakes from Simply Southern Baking
- Cherry and Pistachio No Bake Cheesecake with Animal Cracker Crust from Cravings of a Lunatic
- Mini No Bake Lime Cheesecakes from Miss in the Kitchen
- Neapolitan No Bake Cheesecake from Grandbaby Cakes
- No-Bake Berry Cheesecake from Food Lust People Love
- No Bake Blackberry Cheesecake from You Made That?
- No Bake Dulce de Leche Cheesecake with Caramelized Peaches from The Food Charlatan
- No-Bake Limoncello Cheesecake from Cake Duchess
- No Bake Oatmeal Chocolate Chip Cookie Dough Cheesecake from White Lights on Wednesday
- No Bake Peanut Butter Cheesecake from Dinners, Dishes, and Desserts
- No-Bake Peanut Butter Cheesecake from Crunchy Creamy Sweet
- S’mores Cheesecake from The Gunny Sack
Cheesecake Beverages:
- Black Raspberry Cheesecake Milkshake from Blahnik Baker
- Caramel Cheesecake Martini from Happy Food, Healthy Life
Cheesecake Cookies, Brownies, and Bars:
- Blackberry Cheesecake Brownies by Jen’s Favorite Cookies
- Caramel Apple Cheesecake Bars from Cooking with Jax
- Caramel Overload Cheesecake Bars from Crumbs and Chaos
- Cherry Cheesecake Brownies from Inside BruCrew Life
- Chocolate Brownie Cheesecake Cookies from Lemons for Lulu
- Chocolate Peanut Butter Cheesecake Bars from Chez CateyLou
- Healthier Peanut Butter Cheesecake Brownie Bars from Texanerin Baking
- Lemon Blueberry Cheesecake Bars from Cooking In Stilettos
- No Bake Coconut Lime Cheesecake Bars from Beyond Frosting
- No Bake Cookies and Cream Cheesecake Bars from Garnish with Lemon
- Pear cheesecake with gingersnap crust from Roxana’s Home Baking
- Strawberry Chocolate Ganache Cheesecake Bars from A Kitchen Addiction
Cheesecake Desserts and Treats:
- Banana Foster No Bake Cheesecake Shooters from Mind Over Batter
- Chocolate Nutella Cheesecake Cake from gotta get baked
- Key Lime Cheesecake Trifles from Hoosier Homemade
- Strawberry Cheesecake Pots from Barbara Bakes
- Triple Brigadeiro Cheesecake Tart from From Brazil To You
Frozen Cheesecakes and Treats:
- Blackberry Cheesecake Popsicles from The Girl In The Little Red Kitchen
- Chocolate Caramel Cheesecake Ice Cream from Chocolate Moosey
- Frozen PB&C Cheesecake from Noshing With The Nolands
- No Bake Frozen Peanut Butter Cheesecake {Nutter Butter Crust} from Crazy for Crust
Lisa @ Wine & Glue
Thursday 7th of August 2014
I also had two failures! Glad you kept going!! It looks delicious, and absolutely perfect! Pinned!
Renee
Saturday 9th of August 2014
Oh thank goodness I wasn't the only one with cheesecake failures. Glad you kept going too.
holly waterfall
Wednesday 6th of August 2014
wow you are so patient to have tried many times! I on the other hand, anticipated the fail and just made a martini to save the trouble :) I do want to try it out myself though, so I'm pinning for later!
Renee
Saturday 9th of August 2014
This was very important to me to keep trying. I did have a martini between batches though. Thanks for the pin.
Ala
Monday 4th of August 2014
Oh, I love that you documented this! And while I'm sorry for the "fails," it looks totally worth the effort. It's awesome that your mom has recipes to pass onto you! Love it!
Renee
Saturday 9th of August 2014
I'm fortunate that my mom typed up all her favorite recipes and gave them to me. I love sharing them here too.
Shaina
Friday 1st of August 2014
Your mom rocks!!!!
Renee
Saturday 2nd of August 2014
She sure does! Thanks Shaina
Alice // Hip Foodie Mom
Thursday 31st of July 2014
Renee, your mom's cheesecake looks fabulous. . and third time's always a charm right?! :) good thinking on the double foil. . my first water bath was a disaster too!! love this cheesecake!!!
Renee
Saturday 2nd of August 2014
Yep, the third time is the charm. I just hope I won't have many more first and second failures to deal with in the future.